Sunday, October 22, 2017

Spare Bedroom

The extra bedroom in my house was still looking tatty and tired, despite having the nasty old asthma-inducing carpet taken up and a good clean. With my son getting married next month (second marriage for both of them, so a good excuse for a big party?) and a few interstate and international visitors expected, thought I might be called upon to put people up, so now is the time to get the room spruced up.

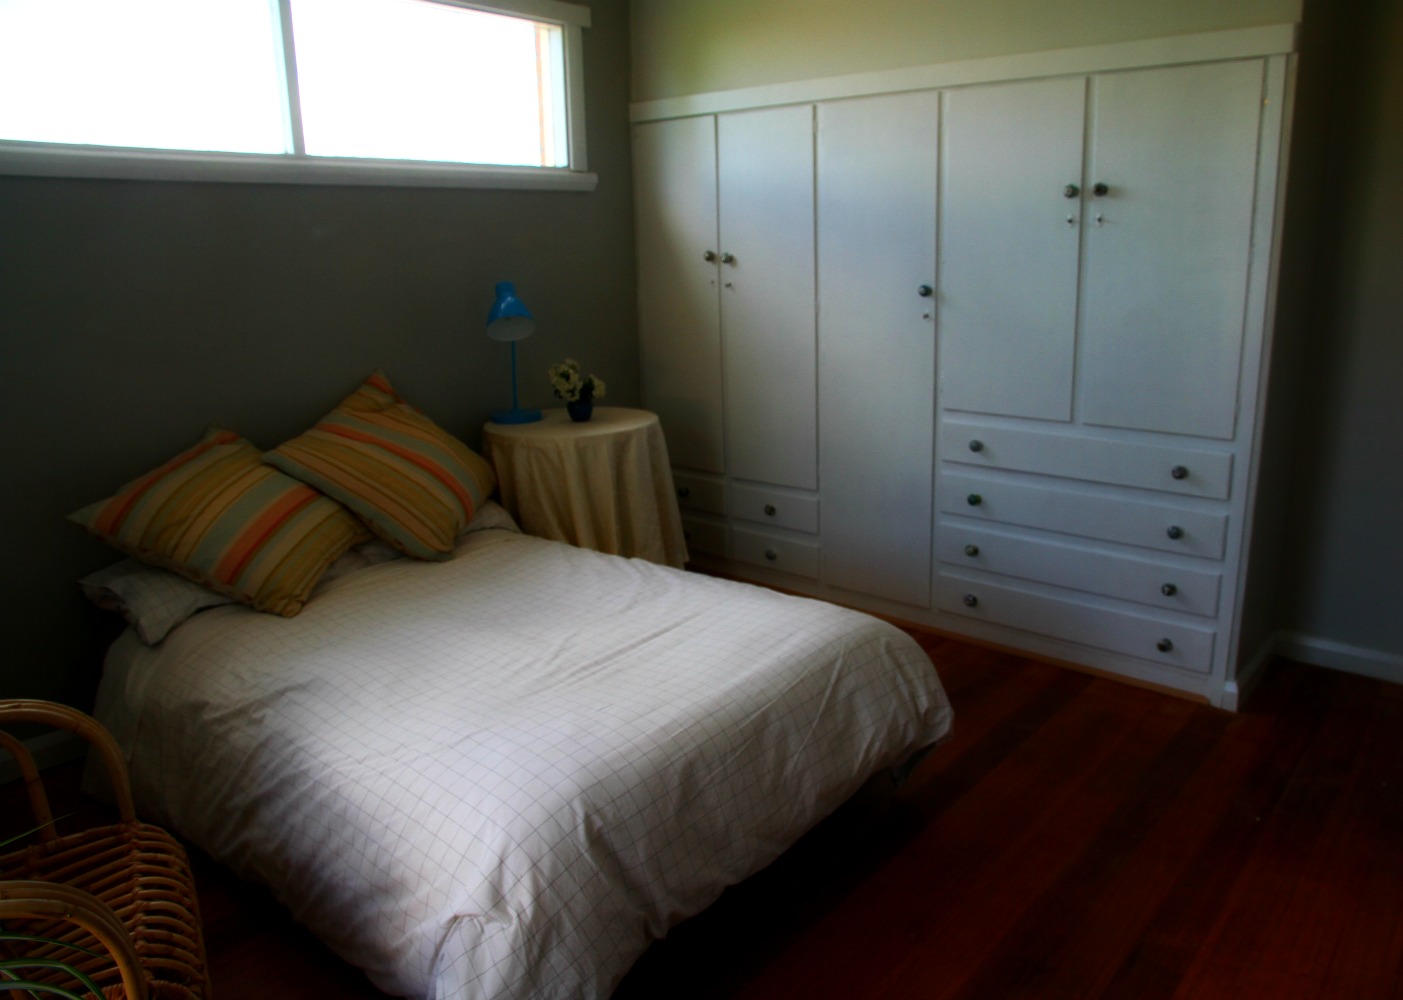
The room was basically OK, but someone had had a half-hearted attempt to paint parts of it in a fairly horrible shade of pink - the built-in wardrobe was the "best" example. And it was coupled with large dark brown resin knobs. It was fairly awful!

The windows had been allowed to get very wet (inside) at some stage, so the paint was flaking and there was black mildew everywhere. I was told the previous owner had had the power cut off the winter before I bought the house, so I'm not surprised there had been damage caused by dampness. I've had two winters here now and the winter of 2016 was the wettest on record, but the house has remained completely dry, thank goodness. I keep the wood-heater going pretty much 24/7 during the winter, so the house stays dry and warm. It does show, however, how moisture intruding into the fabric of a house can soon start to cause real damage, But I digress! I stripped the windows back and painted them fresh white - what a difference! Same with the built-ins - basically in good condition, but just needed a couple of coats of fresh, white paint. I bought some sweet ceramic knobs from an Indian import shop (Ishka, for the locals) - enough for all the doors and drawers......but each one a bit different, except that they are all in shades of blue and green. Looks great!

The door was badly damaged - it looked as if it had been given a thorough kicking at some stage! I thought about replacing it with a new one, but in keeping with my "designer frugal" ethic, I decided to have a go at restoring it first. I took it off its hinges a was able to glue the panelling back to the frame. Once the glue had set, I filled the badly damaged areas where bits were missing. After sanding and painting, it looks like a new door! I probably saved about $100 on the cost of a new door, and while that doesn't sound like much, it all adds up.

I've spent a lot of time and effort removing tacks from the floor and sanding off the paint drips and splodges around the edges (not my doing!) I now need to fill the holes and seal the floor. A couple of rugs around the bed and some new cushions, some pictures on the walls and this room will be done! I'd like to stay in it, if I were visiting.
But silly me! Now I have to pack everything up and clear the room so that I can finish off the floor........but I was desperate to see how it was going to look.


                              ......and now with a few more Ishka touches - a rug and a throw.
 

                                   I love these ceramic knobs - I used thirteen different ones.\
 

Wednesday, October 11, 2017

Spring in the Garden

After a cold start in September, Spring is finally here with milder weather and a blooming garden!
I really like living in a place that has four distinct seasons.........there is always something different happening in the garden. That first head of broccoli is ready to harvest - it will be on my dinner plate tonight!


Monday, October 9, 2017

Blue Door!

At last I have a blue front door! I spent yesterday prepping and painting my front door - it now looks bright and fresh and very welcoming.

Now you can walk up the fourteen steps and actually FIND a blue door!

The lighter shade will be the colour I'll be using to paint all the external woodwork on the house - barge-boards, soffits and window-frames. I'm hoping to get it all done this summer, but that depends on how much repair work needs to be done. I know there is some.
I'm also going to repaint the concrete of the balcony and the steps - at the moment its a rather awful shade of yellowish cream and it shows every speck of dirt and dust and I'm forever scrubbing it.........I'm going to choose a colour that will go some way to hiding some of that dirt and I'll be replacing the old wrought-iron balustrading with something a bit smarter and more enclosing. I want to create a more private and lovely place to sit out the front, with a potted garden and some nice outdoor furniture. This balcony is shady in the afternoon, so it's a great place to find a bit of cool on a summer evening. 


Saturday, September 30, 2017

Hall Table

I've been on the lookout for a small narrow hall table to go in my small entrance hall......seems like they are rare as hen's teeth! I eventually found one advertised in the local online marketplace for very few dollars. Well, it's cheap furniture - poorly made from cheap materials, but is exactly the size I want and approaching the clean, simple style I'm looking for, so it will do until I find or make something better. I think I'll paint the front door this week.........it will be blue at last!


The sculpture is one I made a few years ago; it is called "Demeter"


Thursday, September 28, 2017

A Study Nook

There is a corner in my lounge room that was fairly unusable, tucked as it is next to the fireplace. I decided to turn it into a study nook, with a built-in computer desk with a set of shelves above.

The shelves were a gift from my friend, Lynn, who was flooded out last year in the June flood and had to have the interior of her house stripped out and re-done. These shelves survived the flood and are way too good not to re-use, being made from solid Tasmanian Oak. They also have a kind of mid-century retro look that suits this house. I cleaned them up, which was easy, because they had fortunately been above the floodwater when it came through Lynn's house. They are screwed directly onto the wall into the studs (Thinks: must buy a stud-finder - the studs were HARD to locate!)

I made the desk from a piece of solid, thick plywood, painted grey like the walls and attached with wooden brackets and a strip attached to the wall. It's good and solid.

The chair is a lovely vintage bentwood chair that I've had for years. I made a round cushion to make it more comfortable, using the same fabric that I'll be using to make Roman blinds for the dining room.


Now this corner is no longer dead space, but much-used. I still have a computer area set up in my studio, with scanner and printer, but I love having this second little study!

Spring is finally here: the garden is blooming and really beckoning on sunny days. And it's a great time for Spring lunches with friends!


Thursday, July 6, 2017

Beginning The Living Room

Well...........I recently realized that two months have slipped quietly by since I last posted here - I haven't been idle since finishing the bathroom (..........and HOW much am I enjoying it?) I've simply been busy doing other things, mainly getting my online business back on track after some serious neglect.

I needed a break after the bathroom effort, but I have been surreptitiously sneaking up on the living room renovation. The biggest job in this room will be stripping back, repairing and repainting the huge window. I've already prepared the corner one - its now ready for painting. The rest of the room just basically needs a clean and a re-paint and I'm going to tackle making a set of roman blinds for said huge window.

The room has a fireplace with a built-in Saxon wood-heater in excellent working condition, but some previous owner had slathered a thick, textured coat of white emulsion over the bricks and mantelpiece. A combination of stripper and chipping and scraping got most of it off the bricks, but it was looking like a much harder job on the mantel itself, so I opted for a trompe l'oeil stone look, which I think looks pretty good! 


Here's the fireplace before and during the process of cleaning it up.


..........and a couple of close-ups of the finished mantel.

                                                             Here's how it looks now

I bought this 70 year old two-seater couch recently. I'm planning to refurbish it in the summer, along with a few other pieces of vintage furniture I have. This couch is still as solid as a rock - I love it!


The cats approve of the new couch.......separately! They still only just rub along together.
Now I'm just waiting for that painting urge to hit again so I can finish this room completely........I can feel it coming! 


Friday, May 5, 2017

Autumn

While I was busy inside with bathroom renovations, I didn't really notice that autumn had arrived. I went out into the back yard a few days ago and here is what I found:


And here is the last of the garden's summer produce........note: 16 olives!


Thursday, May 4, 2017

A Bathroom is Done!

After  a reno epic, my bathroom is finally done!
When I think back to how it was, I couldn't be more pleased with this outcome - it is now a joy to be in, in contrast to the depressing, dingy hole that it was a couple of months ago. So here it is.......I'm still waiting on a fitting that goes onto the tiled wall to hold the shower hose - it should be here next week. And the silicone is still curing, so I haven't christened it yet.......but SOON!


Since I last posted, I had the re-finishing company in to professionally re-surface the stained and chipped bathtub - it now looks immaculate. Thanks to Dave and Scott from TasBath for a lovely job. Here are a few shots of the bath being done:

Yuck!

Scott working on the stains and acid-etching the surface..

Stains gone - ready for the base coat

Yellow elephant trunk?

Final coat curing under a heater

Then it was just a matter of waiting until the hand-basin unit arrived to complete the installation. I called on my friend Alan, to help with this. After a few false starts (retro-fitting new to old takes a bit of messing about!) we finally got everything successfully hooked up. And don't you just love a tradie who dresses to match the decor? I got Alan to help me lift the shower screen into place after he'd done the other work (it's heavy!) and I fixed it into position and put in the top bracket.


Alan matchy-matchy!


Here's a finishing touch: my sister, Jan, found this perfect bathmat while she was out shopping and bought it for me. I have a thoughtful sister :-)

So there you have it..........it's as good as done. Here's a little reminder of what it was like before:


Friday, April 21, 2017

Roman Blind

While I'm waiting for deliveries of bathroom fittings, I've been busy catching up with my studio work, which has been somewhat neglected while I've been a bit obsessed with this little phase of my renovation. I did make this roman blind for the window........I want to make a number of these for the house, because I really like the look of them, but I'd never made one, so I wasn't sure how to go about it. I found a couple of really clear and well-explained tutorials online and I jumped right in. My thought was that this small bathroom window could be a practice run for the larger blinds I need to make and if it failed miserably, then it would be no great loss.

It took me a while to find a fabric I liked - this grey and white print was the closest thing I found, but it needed red in it, so I hand-painted in parts of the background first. I think the important thing about making a good roman blind is to measure and cut really accurately - take time to do that part properly! Then the rest is quite straightforward. Here's how it looks in the window:


I've also used the print fabric (without the red painted background) to back the shelves I put together previously. The leaf print is a perfect foil for the otherwise very geometric look of the room - it adds a softer touch.

While I've been working on this room, I've been thinking increasingly about "design style", having come across various "styles" when I look things up............it's not something I've consciously thought about much before - "style", to me, is something that just happens as you live your life, not a "look" imposed on a living space as an artificial, separate thing. But apparently, there's Scandi style, retro style, industrial style, modernist style, brutalist style.........blah, blah, blah.

If pushed to describe my design style with a label, I would probably call it something like "Designer Frugal".  Having been to Art School in the dim, dark past and having worked as a practising artist my whole working life, I know a thing or two about using colour, shape, line and so forth, so that's where the "designer" part of the label comes in. And the "frugal" - fairly obvious..........I don't have much money to splash around! Here are the basic tenets of
 "Designer Frugal Style":

* Don't replace things just for the sake of it - often a bit of hard work can breathe new life into them. This was the case with my kitchen cabinets. Instead of pulling them all out and replacing them, I repaired, replaced catches, handles and hinges and repainted. Half the time what you are going to replace them with might not be as good as the original (who makes dove-tailed hard-wood drawers any more? That's what I saved.)

* Don't be a slave to trends just for the sake of it - be brave and do what you really like. Today's trend is tomorrow's dated look, but if you go for more timeless looks and avoid this year's
 hot new colour trends, well, they don't date.

  * Be open to serendipity.......sometimes something will pop up that you hadn't thought of, so don't be afraid to change your ideas and go with the flow if that happens. That's what I did when I discovered the hidden tile splashback in my kitchen.....I worked how to use them in a new way.

* Learn new skills - you will surprise yourself at how much you can achieve yourself (excluding electrical and plumbing work, or major structural stuff, of course!) YouTube is your friend.

* If you do anything really quirky or idiosyncratic, make sure it is easily reversible.                     

Designer Frugal: Plenty of dash......not much cash.